TurtleCraftyGirl
Showing posts with label cake. Show all posts

Friday, April 26, 2013

Yummiest Chocolate Cake Ever!


For my hubby's birthday last week, I baked this chocolate cake, which as per him and my kiddo, is the best chocolate cake I have ever baked. And I I totally agree with him. This is going to be my go-to recipe for a dense chocolate cake.


The recipe for this cake is from one of my favorite cake blogs Call me cupcake. The ingredients at her blog are in dl(decilitre). 1 dl = 0.42 cup. Below is the approximate conversion of ingredients in cups:

Chocolate cake Ingredients

•1 3/4 cup all purpose flour
•2 cup sugar
•1/2 cup cocoa powder
•1 tsp baking powder
•2 tsp baking soda
•2 large eggs
•1cup dl strong coffee
•1 cup buttermilk
•1/2 cup vegetable oil
•1 tablespoon vanilla extract


Chocolate fudge frosting

•300 grams butter at room temperature
•2 cup powdered sugar
•1/2 cocoa powder
•200 grams dark chocolate, chips or chopped
•1/2 cup heavy whipping cream
•1 vanilla bean or 1 tsp vanilla extract


Hop over to her blog here, to get the entire recipe. I cannot wait to make this cake again. The thick and creamy chocolate fudge frosting goes very well with the cake.


Happy Baking!

Wednesday, April 25, 2012

Sponge Fruit Cake


After months of avoiding any sort of baking, I am back to it. It no longer makes me feel nauseas. For those not aware, anything sweet and especially baking was a complete no no in my house. I just could not stand it. But am feeling better just in time to bake a cake for my dearest Husband's birthday. As he is big on losing weight these days, I kept it light and baked a sponge cake. I followed the recipe posted here. This cake is so light, fluffy and yummy. Iced it with whipped cream with a dash of sugar in it. Layered and topped it with lots of fruits. 


Blowing the candles and ready to attack the cake.
It was over in record time.


My son could not even wait for me to get a spoon. By the time I turned around, he was all into it.

Happy Baking!

Saturday, August 20, 2011

Lightining is ready.. vroom..vroom...vroom....


This is the cars cake I made for Kabir's friends' birthday recently. His Mom told me that he was Cars movie fan. So, I tried to incorporate some stuff from the movie. For the cake topper, I made 'Lightining McQueen' from fondant using the tutorial here. And a flag was an easy addition in the end.

My son was not sure why I was not making King(Blue car) and Mater(Brown car) as well. So, I convinced him that the brown(almost) cake is Mater, and the Blue icing is the King. Not sure if he bought it :-)


, As the Birthday boy wanted a Vanilla cake, I tried few recipes before I finalised this one. Its almost identical to the mom's sponge cake recipe. 

This Vanilla Sponge Cake recipe is adapted from Erica's recipe on allrecipes.com 

Ingredients

  • 6 eggs
  • 1 cup white sugar
  • 1/4 cup water
  • 1 tablespoon vanilla extract
  • 1 cup cake flour (after sifting)**
  • 1/2 teaspoon cream of tartar
  • 1/4 teaspoon salt
**If you are out of cake flour, 1 cup of cake flour can be substituted with 2 tbl spoon of corn starch in one cup, with rest of it filled with regular cake flour.

Directions

  1. Preheat the oven at 325 degrees F (165 degrees C).
  2. Separate the eggs. In a large mixing bowl, beat egg yolks until very thick and lemon colored. Beat in sugar gradually. Add water and vanilla extract. Beat in flour.
  3. In another bowl, beat egg whites until frothy. Then add cream of tartar and salt. Beat mixture until whites are stiff, but not until they are dry. Fold this whipped mixture into yolk mixture.
  4. Pour batter into an ungreased 9 inch tube pan. Bake for one hour, or until done. If using two 9 inch regular pans, reduce the cooking time to 35 minutes.
Tips, Tricks & Lessons learnt
  • In a sponge cake, pan is not to be greased, as the oil in it will hold the batter from rising. But I lined the base of pan with parchment paper. Not sure if I was suppose to do it or not, but it worked out fine for me.
  • Baking powder is not added to sponge cake. The leavening comes only from beaten egg whites.
  • Either warm the eggs before using or take them out of refrigerator much before use. Warmed eggs hold more air and create more volume when they're whipped than cold eggs.
  • Sponge cake tastes the best when soaked with a syrup or flavouring. I always prefer the pineapple syrup in the canned pineapple.
  • Once the batter is ready, it should go into the pans and in the oven immediately. 
  • If using a convection oven, always reduce the baking temperature by 25 degree F than what the recipe calls for. In this case, the baking temperature would be 300 degree F.
Happy Baking!

Monday, June 20, 2011

Cute As a Button Baby Shower Cake


This weekend, I made a 'Buttons' Cake for Baby Shower of a very good friend of mine.  The theme was mainly 'Blue', so instead of doing a simple Blue colored cake, I decided to go with a gray cake, with blue buttons on top.  I got this idea from this most adorable birthday party covered here.

The buttons are made out of fondant, with 3 shades of Blues


For the cake topper, I sew the fondant buttons on a blue thread, just like you would a normal Button.


Here's the room with some decorations.


A baby will make love stronger, days shorter, nights longer, bankroll smaller, home happier, clothes shabbier, the past forgotten, and the future worth living for..


All the best wishes to would-be new parents


Sunday, June 12, 2011

Celebrating 6th Wedding Anniversary


Its hard to believe that its already 6 years since my hubby and I tied the knot. Time passes quickly, very quickly indeed. But someone once said, when you are happy and having fun in a relationship, you don't realize how fast you jump from one anniversary to next.

We didn't do much for the day, but I did bake a red velvet cake. Followed the recipe I posted earlier.

Here's the cake right out of oven.


I wrote little notes for my husband and hid them in the cake.


Cake with the crumb coat on. Definite must on a red velvet cake.


With final coat of icing and the fondant ruffle flower on top. Here's the tutorial from Call me Cupcake for these flowers. I didn't do a very good job  on it. I guess I need lot more practice.


 After cake cutting


Looking forward to many more anniversaries with my dear husband.


Wednesday, January 26, 2011

Red Velvet Cake


Valentine's Day is just days away. What better way to celebrate it than with a Red Velvet cake. Well, it was the last Valentines season when I first tried my hand at Red Velvet cup cakes and my husband loved it. I think he loved the cream cheese frosting more. Valentine's day is normally not a big affair at our home, but I am still excited over trying something exciting to bake or make.

I baked it from my favorite recipe below. I started out with making a 2 layered cake, but one cake got stuck badly, so instead made up cake balls from it, and just a single layer cake with the other. Ended up with not so smooth cream cheese frosting. Actually I did not get a chance to smooth the icing as 3 adults were hovering over me to get away so they can dig into it. So it wasn't surprising when it was over in a matter of minutes.

This is the recipe from pinchmysalt blog.

Red Velvet Cake

2 1/2 cups sifted cake flour*
1 teaspoon baking powder
1 teaspoon salt
2 Tablespoons cocoa powder (unsweetened)
2 oz. red food coloring
1/2 cup unsalted butter, at room temperature
1 1/2 cups sugar
2 eggs, at room temperature
1 teaspoon vanilla extract
1 cup buttermilk, at room temperature
1 teaspoon white vinegar
1 teaspoon baking soda
1. Preheat oven to 350 degrees. Butter and flour two 9-inch round cake pans or three 8-inch round cake pans.
2. Sift together the cake flour, baking powder, and salt into a medium bowl; set aside.  In a small bowl, mix food coloring and cocoa powder to form a thin paste without lumps; set aside.
3. In a large bowl, using a hand mixer or stand mixer, beat butter and sugar together until light and fluffy, about three minutes.  Beat in eggs, one at a time, then beat in vanilla and the red cocoa paste, scraping down the bowl with a spatula as you go.  Add one third of the flour mixture to the butter mixture, beat well, then beat in half of the buttermilk. Beat in another third of flour mixture, then second half of buttermilk. End with the last third of the flour mixture, beat until well combined, making sure to scrape down the bowl with a spatula.
4. Make sure you have cake pans buttered, floured, and nearby.  In a small bowl, mix vinegar and baking soda.  Yes, it will fizz!  Add it to the cake batter and stir well to combine.  Working quickly, divide batter evenly between the cake pans and place them in a preheated 350 degree oven. Bake for 25-30 minutes. Check early, cake is done when a toothpick inserted in the center comes out clean.
5. Cool the cakes in their pans on a wire rack for 10 minutes. To remove the cakes from the pan, place a wire rack on top of the cake pan and invert, then gently lift the pan.  Allow cakes to cool completely before frosting. Frost with buttercream or cream cheese icing (recipe below).
Recipe Notes: *Sift cake flour once before measuring, then sift again with the other dry ingredients per recipe instructions. Wear an apron and be careful with the red food coloring. As you’re mixing the cake batter, use a spatula to scrape down the bowl frequently throughout the entire process. To mix flour and buttermilk, use cut and fold method, instead of the mixer. It makes for a softer cake.
Cream Cheese Frosting
16 oz. cream cheese (2 packages), softened
1/2 cup unsalted butter (one stick), softened
1 teaspoon vanilla extract
2 1/2 cups powdered sugar, sifted
pinch of salt
With an electric mixer, blend together cream cheese and butter until smooth.  Turn mixer to low speed and blend in powdered sugar, salt and vanilla extract.  Turn mixer on high and beat until light and fluffy. Use immediately or refrigerate, covered, until ready to use.  If refrigerated, the frosting will need to be brought to room temperature before using (after frosting softens up, beat with mixer until smooth).
Recipe Notes: If you prefer a sweeter and/or stiffer frosting, more powdered sugar can be added (up to four cups). But remember, the more sugar you add, the less you’ll be able to taste the tangy cream cheese!

Happy Baking!

Wednesday, December 8, 2010

Kabir's 2nd Birthday Party

This post should have been created 2 months back in October, my favourite month of the year, when my dear son Kabir was born 2 years ago. As you all know, I had to go to India at the last minute and this party had to be postponed. The new date for party was set as Nov 20th, vs Oct 30th. I am glad most of the people could make it on this new date.

Invitation
The theme we decided on was Sesame Street as Kabir loves all the characters in it. The invitations were also made on the same lines. I had so much fun designing this card. Got it printed on a white linen card stock, and added a pop up Elmo on top. Then I backed it with an orange card stock to create a border.


After adding the border, this card was no longer of standard size. So I had to come up with this half envelope instead, and decorated it with balloons popping out.

Birthday Boy


Thats the birthday boy, my darling son Kabir, wearing his favourite character Elmo's shirt. It was created by a very sweet seller on etsy and she even customised it to add the number '2' on the back. I loved the way it turned out.  Kabir's hat is also made by an etsy seller. She covered this hat in her blog here.

Decorations
I have been wanting to make these tissue pom poms from a while now. I made 8 of these in all bright colors. This was the last piece to go up the wall/ceiling for the party, so I was dead tired and was thinking that maybe I took up more than I could handle. As I climbed the ladder with this thought, Kabir touched my feet and said 'Good job Mama'. That made it all worth it.


I wanted to make lots of bunting for the party. So I got patches of colorful fabric and rick rack trim. It was as simple as cutting the fabric into triangles and sewing it onto the lace. This was the easiest project I made for the party.

Cake
Birthday cake had to be a chocolate cake as Kabir loves it. I added tons of chocolate chips to it, just to make something special for the kids. For cake topper, I made an Elmo out of fondant. I thought it turned out ok, but when Kabir saw it, he said its 'Papa Elmo'.... lol .. I guess it was a little fat for an Elmo.


Cake Pops
Oooh.. I had so much fun making these Elmo and Big Bird cake pops. Got this idea from Bakerella. I wanted to make Oscar and Big Bird as well, but because of lack of time, had to stick to just these two, as this was the most time consuming. Its red velvet cake pops with yummy cheese frosting added to it.  It was big hit. Kids and adults all liked the pops.


Hats
I enjoyed making these hats in all the Sesame Street characters : Elmo, Cookie Monster, Abbey, Count, Bert, Ernie. I made these out of cardstock paper, and attached a ribbon instead of an elastic for each of these, as little kids were to wear it.


Other stuff on the cake table:
Chocolate Chip cookies from Cookie Monster


Elmo Juice Boxes
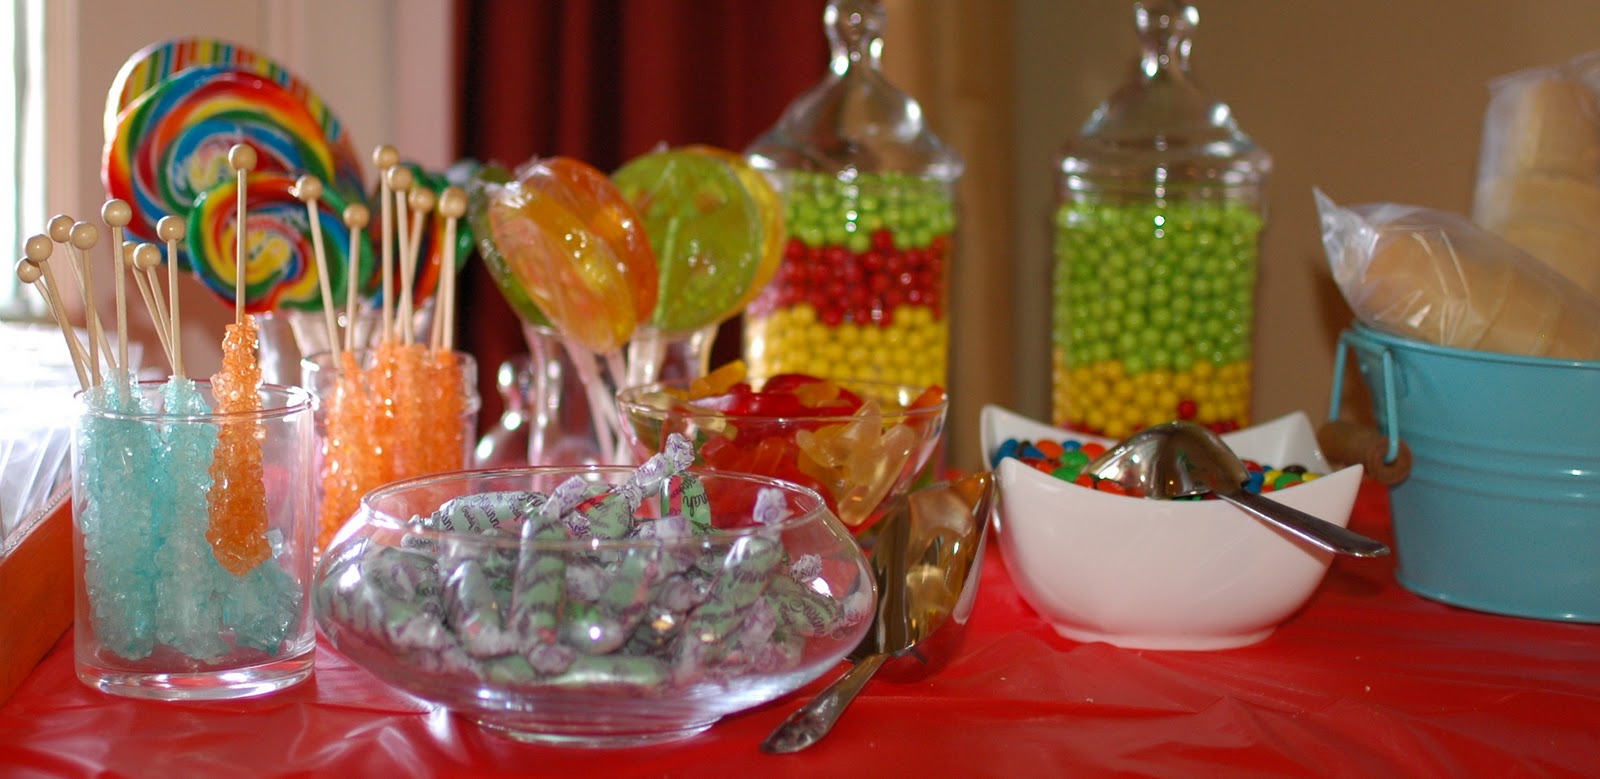
Candy and Ice Cream Buffet
The candy buffet had rock candy, big suckers, sixlets, cookies, M&Ms, swedish fish and alphabets and lots of ice cream. Kabir still asks for the leftovers from this buffet. He thinks that by merrily saying 'Trick or Treat',  he would be handed another candy.

Candy Buffet


Banners
These are all the birthday banners, signs and cake toppers I made for the party.


Cake Cutting
Kabir had waited for this moment for a very long time. He was so ready to blow the candles on his cake. But, he no longer wanted to keep his hat on, so Rohit and I wore one too, in desperate attempt to encourage him to keep his on.


Party Games
We played 'Pin the nose on Elmo', 'Oscars Trash Toss'(everyone's favourite), Big Bird's Journey to Ernie(with Easter eggs), Pass the 'Ernie' and Cookie Monster Pinata. Apart from this, there were kiddie tables and chairs where kids could color or play with playdough.

Goodie Bags
I decorated plain brown bags with Elmo/Cookie Monster on one side, and 'Thank You' note on tthe other side. These bags were filled with 'Bubbles from Ernie', Sesame Street drawing books along with some more goodies. I also made crayon rolls for all the kids at the party. For the kids at Kabir's daycare,  I made Elmo and Cookie monster pom poms from wool.


I loved putting this party together for my little cookie, and his reactions and "wow's" at each step made it worth it. 

Wednesday, August 25, 2010

Red Velvet Cake Balls


Last week I tried my hand at cake balls for the very first time. As Kabir was moved to a new room in his daycare, I wanted to do something for his old room teachers as my way of saying THANKS. I don't have enough words to express how grateful I am for all the teachers at his daycare. I just love them. 

I got the idea of making cake balls from Bakerella. The recipe asked to use the red velvet cake box mix, which I did. Normally, I would have used my favourite recipe for making Red Velvet cake, which can be found here, but this time, I really wanted to try a box mix. What actually prompted me to use it, was a comment on pinchmysalt.com that box mixes are as good, which I knew was not true, but still wanted to try it out. So, the cake balls were serving two purpose.

I got the Duncan Hine's cake mix, and followed the instructions on the box. When I tasted the cake, I knew my hours spent in making cakes from scratch, were not wasted. It tasted like any yellow cake, and had no flavor of red velvet cake. Next time, I will be using my favourite recipe without any hesitation. Cake balls tasted very good though, as once the cream cheese frosting was added, the mixture did not taste that bad. And the chocolate dipping made it taste like heaven. After giving it to the two teachers, I had plenty left at home. So, I took a few to my office and they were all gone by lunch.  Kabir and I ate the rest :-)


I can't wait to try these balls again with my favourite recipe for cake.

Wednesday, June 23, 2010

Fondant Bow Cake


Two weeks back, Rohit and I celebrated our 5th Wedding Anniversary. I wanted to make a special cake for the small party we threw. I have always wanted to make a fondant cake, and so decided to give it a try. On this post, you will find links to many tutorials, as I had to learn most of the stuff involved in icing and decorating this cake. As there is so much stuff available on net, it can get overwhelming sometimes. So this post is my way of documenting everything I learnt along the way, with links to the tutorials I felt helped me the most.

Flavour of the Cake
Decided to make Devil's Chocolate cake as I had got rave reviews when I made it last time for Kabir's teachers at day-care, for Teachers' Appreciation week.

Icing
For icing, I chose crusting Buttercream Icing to get that smooth look. To make buttercream crust, it needs tons of sugar, so I don't specifically like it. I did not exactly put the amount of sugar that recipe called for, but enough to give it a somewhat smooth look, as I was anyway planning to cover my cake with fondant. I used the below recipe from Edna De La Cruz's, except, for the amount of sugar(original recipe called for 4 cups of sugar). Last time, I tried with 2 cups, and my icing did not crust. So I found that 3 is the minimum required for below amounts of butter & shortening.
  • 1/2 cup solid high ratio shortening(with trans fat). I used Walmart brand as Crisco has stopped using transfat in the shortening
  • 1/2 cup butter softened
  • 1 tablespoon of meringue powder
  • 1 teaspoon(or extract of choice)I used vanilla.
  • 3 cups sifted confectioners' sugar
  • 2 tablespoons milk
First sift meringue powder with sugar. In large bowl, cream shortening and butter with electric mixer. Add vanilla and milk. Gradually add sugar, one cup at a time, beating on a slow speed. Add water 1 tsp at a time if icing gets too thick. This recipe yields 3 cups. Please see this link if you want to learn to ice the cake.

Instructions

Step 1: Making of Bow
If you are planning to make some fondant/gum paste decorations for the cake, that should be the first step, as it takes time, sometimes days for these to dry. I made the bow out of fondant which takes the most time to dry. But I added 1 tsp of Gum-Tex to big blob of fondant to help it dry faster. My bow dried out completely overnight, which made me very happy.

Stuff you would need:

  • Fondant (I used Satin Ice fondant as it tastes so much better than other fondants available.)
  • Gum-Tex
  • Rolling Pin
  • Scale/Ruler
  • Sharp Knife or Pizza roller
  • Wax paper( As I did not have any wax paper handy, I used the one from an empty cereal box. Just turn it inside out, and you have a free wax paper).
I used this tutorial to make the bow.

Step 2: Getting the Cake ready
Make the desired cake in two 9 '' round pans. When the cake is ready and cooled off, remove from the pan and level the 2 cakes with sharp or serrated knife. Levelling is important as we are going to layer the cake.

Step 3: Crumb coat Icing
Now comes the Icing. Once the icing is ready, place the first layer of cake on cake board*. Apply thin layer of icing, cover it with other layer of cake. Now apply crumb coat of icing on top and on all sides. Then leave it on shelf for couple of hours(I did not refrigerate it). Crumb coat is nothing but a very thin layer of icing done before the actual icing. It helps stop the cake crumbs mixing in with final coat of icing. It is preferred to have a little thin version of above icing for crumb coat(couple of extra tbsp of water), but I used it as is.
* I made the cake board by cutting the side of a cardboard box in round shape(exactly the size of cake as I do not like my base showing from under the cake), and covering it with aluminium foil.

Step 4: Final coat of Icing
After couple of hours apply a thick layer(1/4'') of icing all over the cake and smooth it as much as possible. Let the icing crust for couple of minutes. You know the icing has crusted when you touch it and it does not stick to the finger. Now smooth the cake using paper towel technique and fondant smoother. I used a regular Bounty paper towel instead of Viva(which has no pattern) as I did not care for the pattern on paper towel. Gently press the paper towel with the fondant smoother on top and on sides. Leave it overnight out on shelf. Cover it lightly with paper towel as icing needs air to crust.

Step 5: Rolling the Fondant
Now comes the best part of covering it with fondant for that 'oh so smooth' look. Knead the fondant on a clean surface and add desired gel color with a toothpick, little at a time. Continue to knead until all the color is evenly mixed. Start rolling the fondant with rolling pin, till its 1/4'' thick. Keep using powdered sugar frequently to prevent fondant from sticking to the surface. The diameter of final rolled fondant should be the diameter of cake + length of both sides + some extra.

Step 6: Fondant on Cake
Spray little water on the cake to help fondant stick to it. Place the cake(along with cakeboard) on the turn table or some box to give it height. I used my shortening box. Slowly place the fondant on cake, and gently press it on all sides so it sticks with cake. Cut the extra from all sides using pizza roller or sharp knife. Smooth the fondant with fondant smoother. Here is a video for kneading and placing the fondant on cake: I omitted the piping gel and cooking spray from it.

Step 7: Fondant beads
To make the beads, you can buy Bead makers. But I did not want to spend money on something I wouldn't use very often. Rolling each bead with hand was not giving a bead of same size each time. So I took the biggest icing tip, and used the back of it to cut circles, and rolled these to make beads. This ensured all my beads were of same size.

Step 8: Finale
Place the bow or any decorations on cake now. Stuff like bows which are prepared in advance, need candy melt to stick to cake. Any fresh cutouts can be attached to cake with just water. The beads of fondant around the base of cake have been attached with little bit of water, as soon as I rolled it.

Happy Baking!
Related Posts Plugin for WordPress, Blogger...