TurtleCraftyGirl
Showing posts with label felt. Show all posts

Monday, December 13, 2010

Flower Hair bands


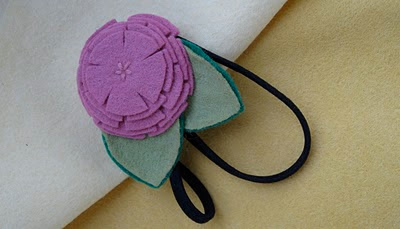
Making these Flower Hair Bands has been one of my favourite projects. I have realised I enjoy working with felt and hand sewing more than anything else. I made these hairbands for my nieces in India. The girls asked me for the felt flowers long back, and I decided it was high time I made it. So before my last trip to India two months back, I completed this project to take it back with me. While I was on it, I made one for my cousin and myself, as I could not stop making these flowers. I used eco-fi felt for most, but I could not get all the nice shades of pink in it. So I ordered semi wool felt from etsy, and it felt so nice to work with. I don't think I can go back to working with the other felt now. This felt looks and feels so much better. It also cuts nice, and my flowers lay flat. Long story short, I will be ordering many more bundles of this felt. Love it.


This one flower band is for my younger niece Jahnavi. I used a soft broad band for her but I still doubt she will keep it long on her head though.


This 3 flower band is for my older niece Ananya. In the picture below, one flower looks blue, but it was actually more lavender.


This one is for my dear cousin Mini(Didi).I made a similar one for myself too.I still have to make one for my sister Henna before she visits me this month(hopefully). I had thought of making bands for us with 3 flowers, but when I tried it on, Rohit called me 'champa', and I decided to keep it minimum for the adults. And I think all of us would be wearing the one flower band more often than the 3 flower band.  But my sis as usual wants 6 flower band too..lol. Love her. 


Here is a picture where I am wearing this band I made for myself.


I wish I could have met and given these bands to my sweetest nieces personally, but as it was not a planned visit, I could not meet them.  So Didi, you would have to tell me if the girls liked it once you visit home.

Friday, July 16, 2010

Camera Case


Couple of weeks back, I made this camera case for my sister, just was too lazy to post about it earlier. I like how it has turned out though. Rohit likes it so much, that he now wants me to make one for us too. Its made out of craft felt and has some foam padding to cushion the camera. On the back side, there is a wool loop which hooks on to the button, to secure the camera.


The final camera case measures: 3 3/4 * 2 3/4 * 1.25
Stuff needed:                                                                                                                            
  • Felt in 2 contrasting colors. I used orange and brown.
  • Black felt
  • 4 matching buttons of different sizes
  • Regular thread/wool/crochet thread
  • Needle
  • Scale
  • Sharp Scissors
How To: 
Step 1: Find your camera's measurements and accordingly cut 2 types of strips. The camera I was making it for is: 3.6 *2.2 * 1. So I cut 2 broad strips(brown & orange placed together) 10 inches long and 3 inches wide. Brown strip would make the outside, and orange the inside of the body of case.
Cut 4 thin strips of orange felt which are 1.5 inches wide and 4 inches in length. This would be the sides of case.


Step 2: Now lets make decorations.


To make the center circle deco, cut orange circle the biggest size, and black the smallest. Use any printed fabric for the center circle. I cut out sleeves of an old shirt in the pile of discarded clothes.


Step 3: Sew your largest button in a crisscross fashion using orange thread*, to the black circle. Now stitch black circle with button to the printed cloth, and printed cloth to orange circle. For thread, I used a crochet thread. As it was too thick for this purpose, I split it into half, 2 threads with 3 strands each(instead of 6).


Step 4: Its time to attach the deco to the main strip we cut in step 1. But first you need to add the foam padding in between 2 broad strips. I used the thin foam padding which came in any packing box. Once you cut the foam of same size as the strip, place it between the brown and orange strip, with brown felt facing up. Sew the circle deco to the strip. You are basically sewing the orange circle to the strip. Position it the way you want. You can add whatever decorations you want to at this time.


Step 5: Its time to start closing it in. But before that, mark the points from which to start attaching the sides, as below.


Step 6: Take the 2 (out of 4) orange strips cut in Step 2. This will be our one side. I am using double strips on each side just to give it enough padding. Using blanket stitch, start attaching the orange felt on the side to the brown strip as below:


From the Right side of brown strip(as shown in picture above), start attaching orange strip from Line 2, rounding between Line 3 and line 4, and going all the way up to Line 5. Here the orange strip is complete, but keep going horizontally on Line 5, to make a nice edging, until you reach the other side of Line 5.


Now you are on the left side of the strip. Pick up the other 2 strips of orange felt and start attaching it from Line 5, straight until Line 4. Round it up between Line 4 and Line 3, and then straight until Line 2. Now your orange strip is complete, but keep going on with the blanket stitch until Line 0. Keep stitching horizontally on Line 0 until you reach side Right. Stitch vertically from Line 0 to Line 2, until you reach the point where you started.
Now stitch horizontally both the edges of side orange strip with the blanket stitch.


Here is how the front and back looks:


Happy Crafting!


Related Posts Plugin for WordPress, Blogger...